How to Navigate to the Product List Screen
- To get started, select the Products and Inventory menu, then click on Products List to view all available products.
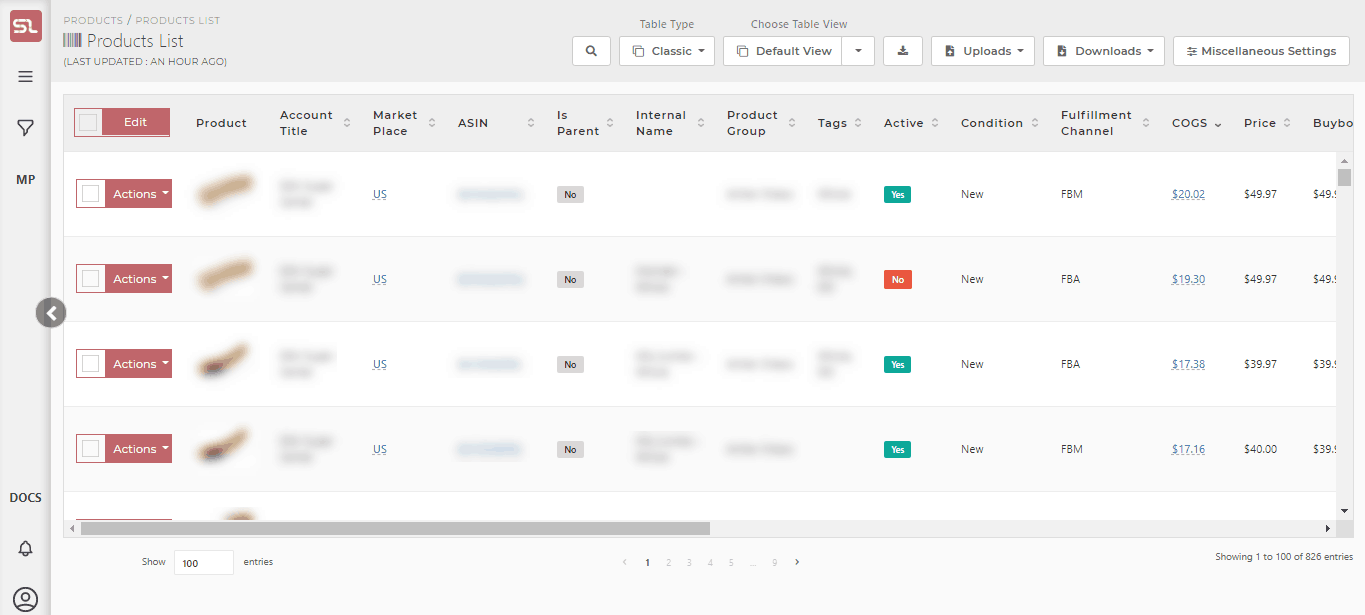
What is the Product List Screen?
The Product List screen is your central hub for viewing and managing Amazon product data. It features:
-
A Data Table displaying up to 41 product attributes, such as ASIN, COGS, Fulfilment Channel, Price, Buybox, Net Profit, and many more.
- Access to Product Settings that allow customization of the Profit Formula, ROI Formula, and Margin Formula to make sure that these critical KPIs are calculated exactly like you want them.
-
Filters to narrow down products (e.g., by Marketplace or Hidden status, including ranges of values, Boolean filtering, set filtering, and Regular Expressions [RegExp]), all data fields are dynamically populated with autofill values.
-
Inline data entry (in-place editing) for some fields like Internal Name and Tags.
-
Access to A COGS Entry Form for managing Cost of Goods Sold (COGS) with date ranges and currency conversion.
- Access to Currency Conversion Tables providing daily exchange rates for 18 most popular currencies
-
Bulk Actions to update multiple products (e.g., hide, show, or edit COGS).
-
Export Options to download COGS data for reporting in Excel or CSV format.
- An function to bulk upload via Excel spreadsheets
- Cost Of Goods
- Product Settings and Attributes
Hints And Tips!
- The details of your Products List are retrieved from Amazon once every eight hours
- You can see how long ago the products page was updated just below the page title (e.g Last Updated : 2 hours ago)
- By default, the Products List is ordered by Marketplace, starting with the active products within the marketplace first, followed by the inactive products
- If a product was manually hidden by the user, it will not be shown on this screen until the product is un-hidden
- Bookmark the URL: Save https://v4.sellerlegend.com/products/index for quick access.
- After reaching the Product List Screen, use the Marketplace/Groups filter (e.g., US, UK, DE) to focus on products in a specific region. Or use a group to aggregate data across marketplaces/regions expressed in your favourite currency.
- Troubleshooting:
- Can’t find the Products List? Check if your account permissions allow access (contact your account admin or support@sellerlegend.com).
- Can’t find a specific product attribute? Make sure that your Screen View includes the attributes you need.
- Learn how to Hide or Unhide a Product
Screen Print
What Data Can I See in the Product List?
The Product List displays 41 fields, grouped into categories for clarity. Some fields are hidden by default but can be enabled via the DataTable’s column visibility settings or included in exports. Below is a comprehensive table of fields, their purpose, and some examples. The list below describes every field individually.
(*) denotes features not yet implemented at the time of writing
-
Select Product Tick box
The tick box at the start of each row in the SellerLegend Product List screen is a checkbox that lets you select individual products for bulk actions. As an Amazon seller, you can use these checkboxes to quickly manage multiple products at once, saving time when updating or organizing your inventory.
-
Dropdown menu (⋮)
The dropdown menu(⋮) column in the Product List is your go-to spot for managing individual products. Each product row has a set of handy buttons that let you take control. See also How to Update Multiple Products at Once below.
Here’s what you can do:
- View Children:
- What it does: For parent ASINs, shows a list of child ASINs (variations, like different sizes or colors) associated with the product.
- How to use it: Click the three dots(⋮), select View Children, and view a list of child ASINs (e.g., in a pop-up or redirected to the Product List filtered by Parent ASIN).
- Example: For a parent ASIN “B07GV525N0” (Blue Widget), see child ASINs for 12oz and 16oz versions.
- Tip: Use this to manage variations collectively, like updating COGS for all children
- Edit Product:
- Click this button to update details like the product’s nickname, tags, or key dates (e.g., when it was first listed or when it’s expected back in stock).
- This opens a form to update product details, such as Stock Reorder Calculation Setting, Crate Settings, Stock Out Notification settings, Product Image Settings, Product Grouping Settings, Miscellaneous settings, Discount Settings, Other Notification Settings and Non-COGS Settings.
- See also how to edit multiple products at once below.
- Product Notes:
- Allows you to add or edit manual notes for the product, such as supplier details, restocking reminders, or special instructions.
- Profit Calculator:
- Opens a tool to calculate profitability metrics for the product, factoring in Price, COGS, FBA Fees, Referral Fee, Taxes, and Miscellaneous Costs. It displays metrics like Net Profit, ROI, and Margin
- Enter Cost Of Goods:
- Click here to adjust the Cost of Goods Sold (COGS), like the purchase price or shipping costs. You can add new cost details, update existing ones, or even apply them to European marketplaces if needed. It’s a simple way to keep your financials accurate.
- Hide Product:
- Use this to tuck a product away from the main view, like if it’s discontinued or you don’t want it showing up right now. It’s an easy way to declutter your list without losing the data.
- Show Product:
- If you’ve hidden a product and want it back in sight, this button brings it back into the main list. Great for when a product is restocked or ready to be active again.
- View Orders:
- Takes you to the Orders Screen filtered to show all orders for the selected product, including details like order date, units sold, and promo codes used. This helps you track sales history.
- Check Inventory:
- Redirects you to the Inventory Screen for the selected product, showing details like current stock levels, inbound units, reserved units, and days of inventory left. Inventory data is updated every 8 hours
- Monthly Valuation:
- Provides access to the Product Monthly Valuation Screen, showing the product’s inventory valuation as of the last day of the previous month (e.g., July 31 for a report on August 6). It lists stock levels across Fulfillment Centers and detailed dispositions (e.g., Sellable, Unsellable).
- Product Dashboard:
- Takes you to the Product Dashboard for the selected product, showing key performance indicators (KPIs) like Units Sold, Revenue, Profit, and PPC Costs over a chosen date range. It includes charts (e.g., PPC pricing history) and widgets for quick insights.
- Sales Rank History:
- What it does: Displays a historical chart of the product’s Sales Rank over time, showing how its ranking in its category has changed.
- Example: See if “Blue Widget’s” sales rank improved from 1234 to 500 after a price drop.
- Tip: Combine with Product Dashboard to correlate rank changes with sales or PPC campaigns
- Upload Image:
- What it does: Allows you to upload or replace the product’s main image to update the listing’s visuals on SellerLegend.
- Delete Product:
- This lets you remove a product completely, but only if it has no order history. If it does, you’ll get a note saying it can’t be deleted—perfect for avoiding accidental data loss.
- If there’s at least one order attached for the product, the option to delete the product will not be shown on the actions menu.
- View Product Statistics:
- Takes you to the Sales Statistics Screen to see detailed performance metrics for the product, such as sales trends, revenue, and profit over a selected time period.
- Quantity in Warehouse:
- What it does: Displays or allows you to update the number of units stored in non-Amazon warehouses (e.g., your own or 3PL warehouses), used for inventory calculations like Days Inventory Left.
- Example: Update “Blue Widget” to show 200 units in your Supplier X warehouse.
- Tip: Manually update this field, as SellerLegend doesn’t automatically adjust it. Use it with Check Inventory for complete stock tracking.
- List suppliers:
- What it does: Shows a list of suppliers assigned to the product, including details like supplier name, contact info, and lead times.
- How to use it: Click the three dots, select List Suppliers, and view a pop-up or tabbed list of suppliers.
- Example: See that “Blue Widget” is supplied by Supplier X and Supplier Y, with Supplier X as the preferred supplier.
- Tip: Use this to quickly check supplier options before reordering.
- Assign Product to Warehouse:
- What it does: Lets you assign the product to a specific non-Amazon warehouse (e.g., your own or a 3PL warehouse) for inventory tracking. The warehouse quantity starts at zero.
- How to use it: Click the three dots, select Assign Product to Warehouse, and choose a warehouse from a pop-up list (e.g., “Warehouse Inventory” tab). Mark it as the preferred warehouse if needed.
- Example: Assign “Blue Widget” to your new Chicago warehouse.
- Tip: Update Quantity in Warehouse after assignment to reflect stock levels.
- Assign Product to Supplier:
- What it does: Assigns the product to a supplier for restocking purposes, allowing you to link it to one or more suppliers (only one can be preferred).
- How to use it: Click the three dots, select Assign Product to Supplier, and choose a supplier from a pop-up list (e.g., “Replenish By Ordering From Suppliers”). Set a preferred supplier if desired.
- Example: Assign “Blue Widget” to Supplier X with a 10-day lead time.
- Tip: Use List Suppliers to review assignments. Suppliers can be managed via bulk uploads in the Suppliers and Warehouses spreadsheet.
- List Warehouses:
- What it does: Displays all warehouses (Amazon and non-Amazon) where the product is stored, including details like warehouse name, city, and notes.
- How to use it: Click the three dots, select List Warehouses, and view a pop-up or tabbed list (e.g., from the Warehouses tab in the Suppliers and Warehouses spreadsheet).
- Example: See that “Blue Widget” is stored in Amazon’s JFK8 Fulfillment Center and your Chicago warehouse.
- Tip: Add notes with URLs (e.g., Google Docs links) in the Warehouse List Screen for quick access to warehouse details.
- View Children:
-
Product Image
- A small image of the product
- Clicking on the image will take you to the Product Dashboard for that product
-
Product Title
- The Title of the product as it appears on your Amazon listing
-
Marketplace
- The marketplace the product belongs to
- If the same product exists in more than one marketplace, then it will be repeated on a distinct row per each marketplace
- The marketplaces shown in the Products List screen is governed by the Marketplace Selector (the Amazon icon in the top right side of the taskbar)
-
ASIN
- The ASIN of the product
- Clicking on the ASIN will take you to your product’s listing on the Amazon catalog
- SellerLegend uses the short URL version of your ASIN to take you to the product listing. Clicking on the ASIN, therefore, does not adversely impact your conversion rates.
-
SKU
- The Stock Keeping Unit number of the product is defined in SellerCentral.
-
FNSKU
- The Fulfilment Centre SKU of the product.
- A unique identifier is assigned by Amazon to products stored in and fulfilled from an Amazon fulfillment center.
-
Parent ASIN
- The parent ASIN of the product.
-
Is Parent
- The parent ASIN of the product.
-
Adult Product Flag
- Shows if the product is from the Adult category
-
FBA Fees
- The sum of all FBA fees (per order and per item fees).
- This is the Standard product fee, not the S&L fee. S&L fees, when applicable, will be charged instead when an order is placed.
- Hover on fee value for breakdown
-
Commission
- Previously part of the FBA fees.
- It is the commission deducted by amazon as a referral fee.
-
B/E Price
- The Break-Even price of the product is calculated as (Product COGS + Product FBA Fee – Referral Fee) / (1 – Referral Percentage).
- Hover on B/E value for breakdown.
-
VAT Percentage
- The VAT percentage for this product as of today is based on your specifications in Settings->Europe VAT for the marketplace-related or product-related settings.
- Hover on VAT value to see the percentage.
- For more information on VAT see here
-
Internal VAT/Tax
- For the US, the amount of tax is calculated by Amazon.
- For Europe, the amount of VAT is either calculated by Amazon (if you have subscribed to Amazon s VAT collection or VAT billing service) or by SellerLegend (based on VAT parameters set in Product VAT settings).
- If calculated by SellerLegend, hover on the value to see the breakdown.
-
Net Profit
- The Net Profit for this product.
- Hover on Net Profit value to see the breakdown.
-
ROI
- Return On Investment.
- Calculated as Net Profit / Costs * 100.
- You can customize what constitutes Profit and Costs.
- Click on the Settings Panel Button (on the right) -> Edit ROI formula and define YOUR preferred method to calculate ROI.
-
Margin
- The Margin for this product, calculated as Net Profit / Product Offer Price) * 100.
- Hover on the Margin value to see the breakdown.
-
Open Date
- Received from Amazon.
- It’s intended to be the date when the product was first listed on Amazon.
- Amazon may update it, for instance, when a product is activated after a period of time.
-
Hidden
- If the product is hidden in the system or not.
- Do note hidden products are considered inactive and are not updated in the system
-
Internal Name
- The Internal Name you have assigned to the product.
- Learn how to assign Internal Names to products
-
Active Flag
- A flag to indicate whether the product is Active (Green) or Inactive (Red)
-
Brand
- The product’s Brand as specified on the Amazon listing
-
Product Group
- The product group this product is assigned to
- Learn how to Define And Assign Product Groups
-
Condition
- The condition of your product as specified on the Amazon listing (New, Used)
-
Fulfillment Channel
- Whether the product is fulfilled by Amazon or by the Merchant
-
COGS (Cost Of Goods)
- The currently applicable COGS for the product
- If the COGS field is not empty and shows a blue hyperlink, clicking on the link will take you to the COGS Entry screen
- If the COGS field is empty, a COGS can be assigned to the product by clicking on the Actions button and selecting Enter Cost Of Goods
- Learn how to Assign COGS To Products
-
Price
- The Price as specified on the Amazon listing details
- Note the Last Updated mention next to the screen name to determine how recent the price observation is
-
Buy Box
- The latest observed buy box price
- Refer to the Last Updated mention next to the screen title to determine how recent the buy box observation is
-
Holds Buy Box
- A flag that shows if the product holds a buy box or not
-
Sales Rank (BSR)
- The latest sales rank for the product
-
FBM Shipping Cost
- If you handle FBM orders, the shipping costs will be shown under this field and will be factored into the net profit, margin, and ROI calculations displayed in the Products list.
- Learn how to bulk Upload/Edit/Download shipping costs for FBM orders.
- Learn how to Prefix FBM Shipping Cost for all future orders
-
Miscellaneous Costs
- This concerns miscellaneous costs associated with FBM (not FBA), which you’ve manually inputted either via bulk miscellaneous costs upload or through individual product settings for each item and will be factored into the net profit, margin, and ROI calculations displayed in the Products list.
-
Internal Price
- The Internal Price feature allows users to set up automatic internal pricing for non-Amazon orders at the product level. This can be configured through the new settings page, accessible via the product settings modal or through a product setting bulk upload process.
- Once an internal price is set for a product, it can be activated by account-level settings. When enabled, all non-Amazon orders containing products with updated internal prices will use these prices automatically.
-
Tags
- Any Tags you have assigned to the product pertaining to this order
- By using the Filters or the Omni-Search bar, this allows you to quickly view all the products featuring the same Tag(s)
- Learn how to Assign Tags To Products.
-
Manufacturer
- It is an editable column that allows the user to enter the manufacturer’s name
- You can edit this column by double-clicking on it,
- If data for this column is retrieved from Amazon, it will take precedence over the user-editable entry.
- it can also be edited from the product modal
- Learn how to edit in Product Modal here
Other Hidden Columns
- Many columns are hidden but can be added at any time
- Learn how to hide/unhide columns
How to Update Multiple Products at Once
- Select the Products:
- Look at the left side of the Product List where you’ll see a checkbox next to each product. Click the checkbox for each product you want to update, or click the “Select All” checkbox at the top of the list (on the title bar) to choose all the products you’re currently viewing.
- For example, if you want to update “Blue Widget 12oz” and “Red Gadget 5in” together, just check their boxes.
- Start the Bulk Update:
- Once you’ve selected the products, find the “Bulk Update” button at the top the table (it’s the little cog on the title bar). Click it to begin.
- This opens a simple way to apply changes to all the selected items at once.
- Choose Your Change:
- You’ll see modal box which allows you to make changes to inventory settings, product grouping and miscellaneous changes, like hiding or showing the products, or even updating details like tags across all of them.
- For instance, you could choose to hide all selected products if they’re out of stock, or add a “clearance” tag to mark a sale.
- Apply the Changes:
- After picking your update, click on the Save box in the modal. The system will apply the change to every product you selected, saving you time.
- If something goes wrong, like trying to delete products with orders, you’ll get a note letting you know it can’t be done.
Related Posts
- How Do I Define An Internal Name For A Product?
- How Do I Assign Tags To Products?
- Learn how to Define And Assign Product Groups
- What is Period-Based Cost Of Goods?
- How Do I Define A Cost Of Goods For A Product?
- How Do I Know Which Dates To Use In COGS Periods When New Stock Arrives?
- How Does SellerLegend Determine The COGS For An Order?
- Cost Of Goods (COGS) Screen
- How Do I Reveal/Hide Additional Screen Columns?